9 useful tips to use ScrapeBox for your SEO workflow
How to use ScrapeBox for link audits, link building, and on-page SEO
Google must hate ScrapeBox. It’s long been a favorite tool of black hat SEOs. But now this infamous tool is finding new life as an excellent timesaver for white hat SEOs.
In this revealing tutorial, LRT’s Xpert and case study extraordinaire, Bartosz Góralewicz, shows us how to use this tool of darkness to make Google very happy with your website.
Ditching Excel is just one of the many great reasons for using ScrapeBox to do the heavy lifting on your next link audit. If you still haven’t audited your sites, please do your sanity a favor and audit your links ASAP.
Going crazy is all too common among us SEOs. Thankfully, tools like ScrapeBox help us put more distance between us and padded walls. I’m sure you will find this tutorial as useful as we did. It’s yet another lifesaver any serious SEO cannot live without.
- Enjoy & Learn!
Christoph C. Cemper
Bonus: You can download this Tutorial in PDF, ePub, and Kindle format for easy offline reading. Get the eBook Download for a Tweet
Introduction
The SEO community seems to be divided into two groups: fans of manual work and link processing with e.g. Excel, and fans of tools made to speed up the process, like LinkResearchTools and ScrapeBox, created specifically to speed up working with backlinks. Obviously, I am not a huge fan of Excel myself.
ScrapeBox was one of first automated Black Hat tools. Nowadays I doubt that anyone is still using ScrapeBox for mass blog commenting. Not because comment links are not that powerful anymore, but mostly because there are many more advanced Black Hat SEO tools.
Now, after 5 years, ScrapeBox is making up for all the SPAM issues from the past by helping with link audits, White Hat link building and on-page SEO work.
Why ScrapeBox?
- Scrapebox is really cheap – it costs only $57 ($40 discout price) when bought with the BlackHatWorld discount here: http://www.scrapebox.com/bhw
- It is a one-time-off payment for life
- It is easy to use
Overview
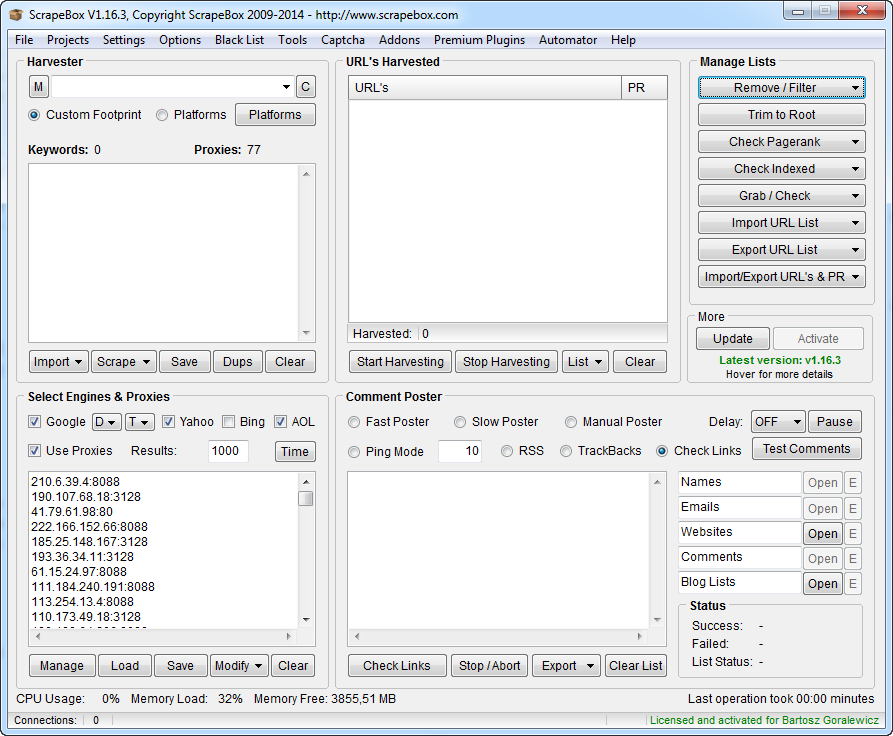
As you see, the tool itself looks quite simple when opened. Now let me explain the most important fields step by step.
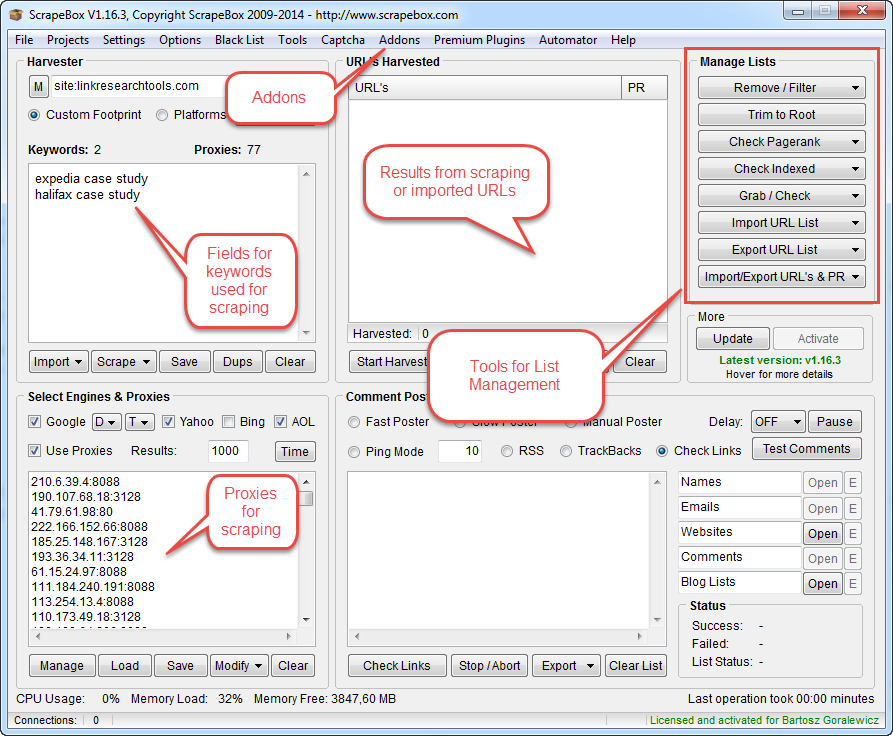
You can do most of the list processing from the main window above. For some more advanced actions, we need to go to the “Addons” tab.
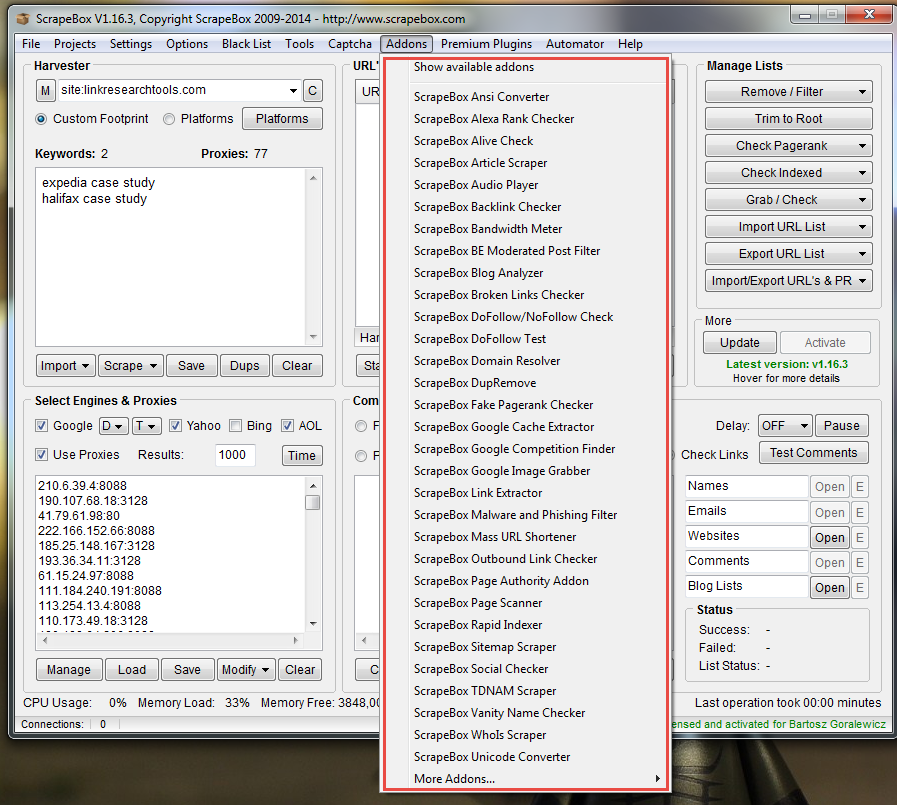
Processing the link lists
Let’s start with the basics. As a good example, each one of you has been in a situation where you were just flooded with link reports from an ex SEO agency, exports from Google Webmaster Tools, MajesticSEO, Ahrefs etc. I bet each and every one of you that having this organized quickly has a huge value, but only when you can do it within 5 minutes.
Let’s see what we can do with such a situation step by step.
1. Removing duplicate links
Instructions:
- Open ScrapeBox
- Click “Import URL list”
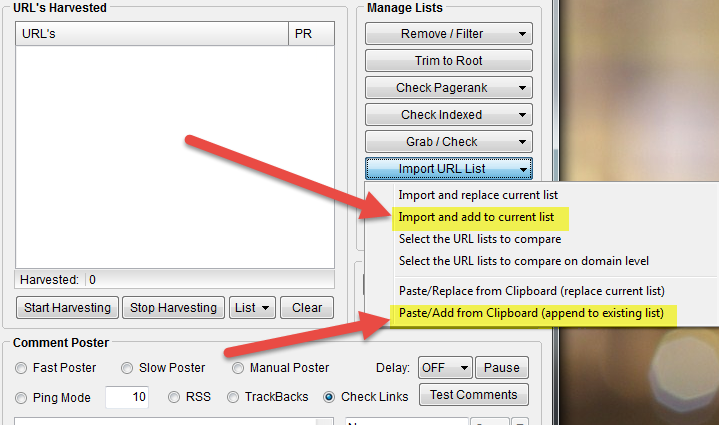
- Click Paste/Add from Clipboard (or “Import and add to current list” if you want to import from a TXT file).
- Repeat with each of the lists you have
- After you’ve pasted all the URLs, click Remove/Filter
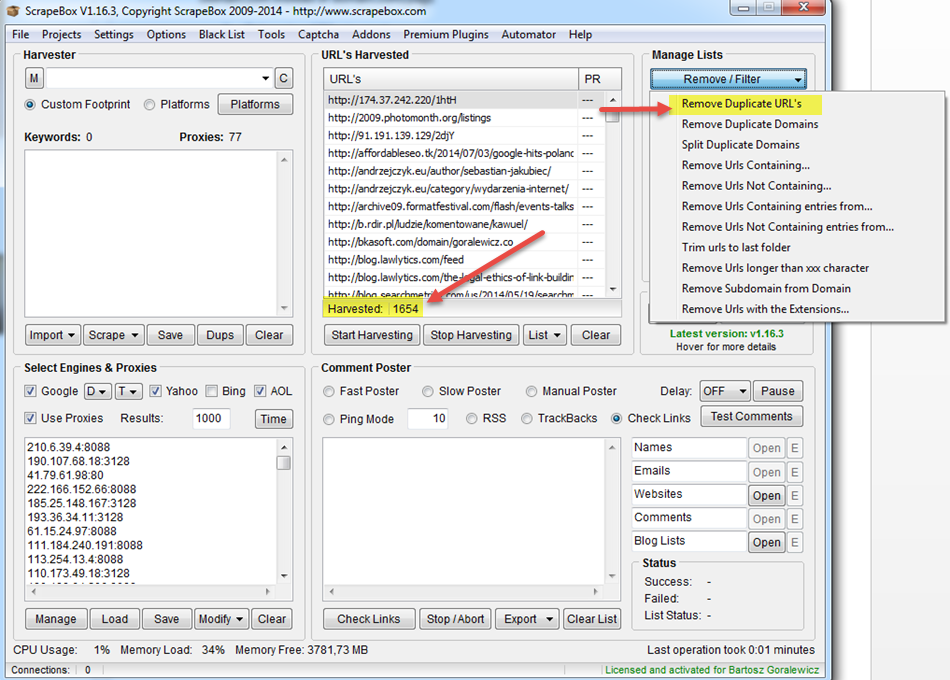
- Click Remove Duplicate URLs
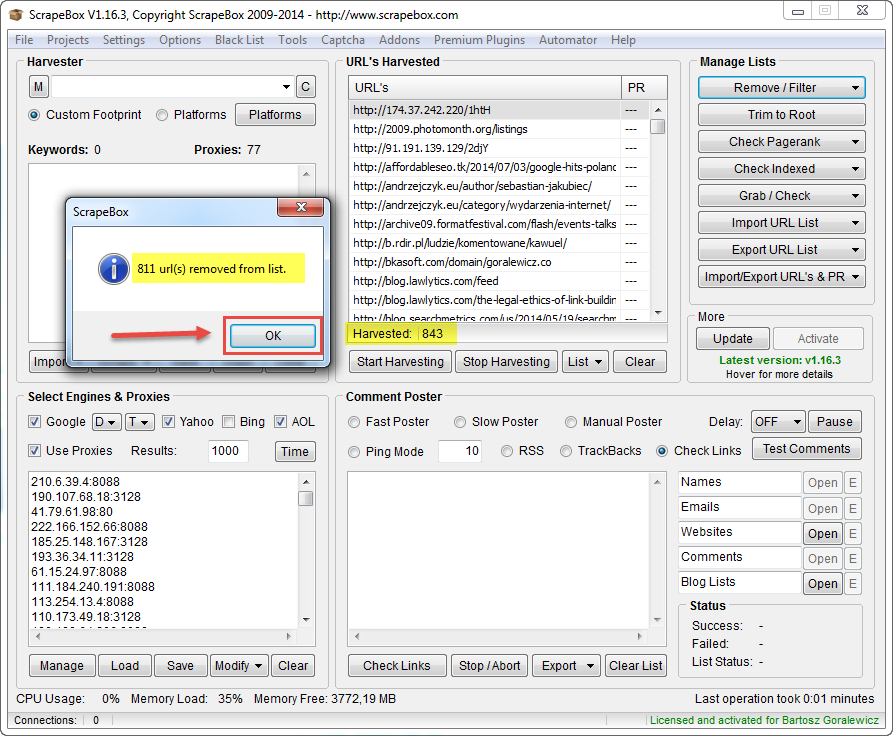
Now you’ve got a list of unique URLs that you can save, and use only 1 file for all your reports.
2. Removing duplicate domains
Instructions:
- Open ScrapeBox
- Click “Import URL list”
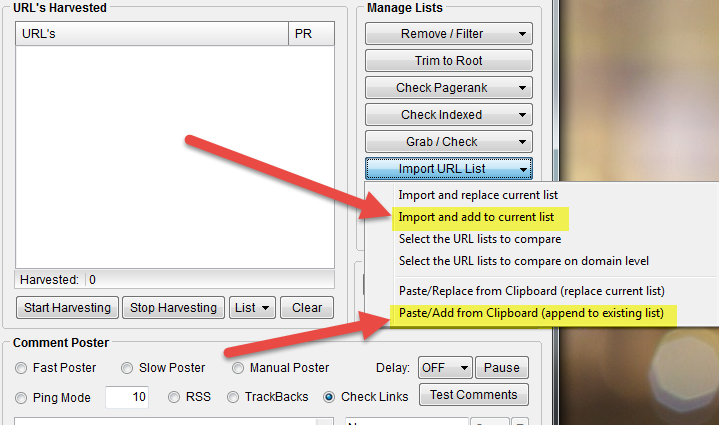
- Click Paste/Add from Clipboard
- After you’ve pasted all the URLs, click Remove/Filter
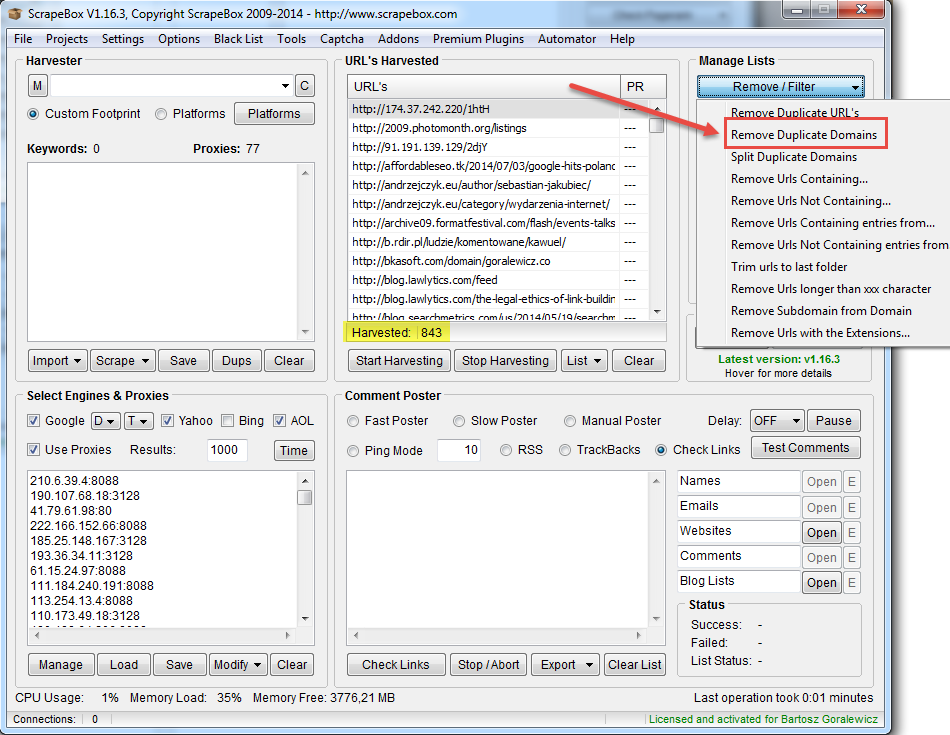
- Click Remove Duplicate Domains
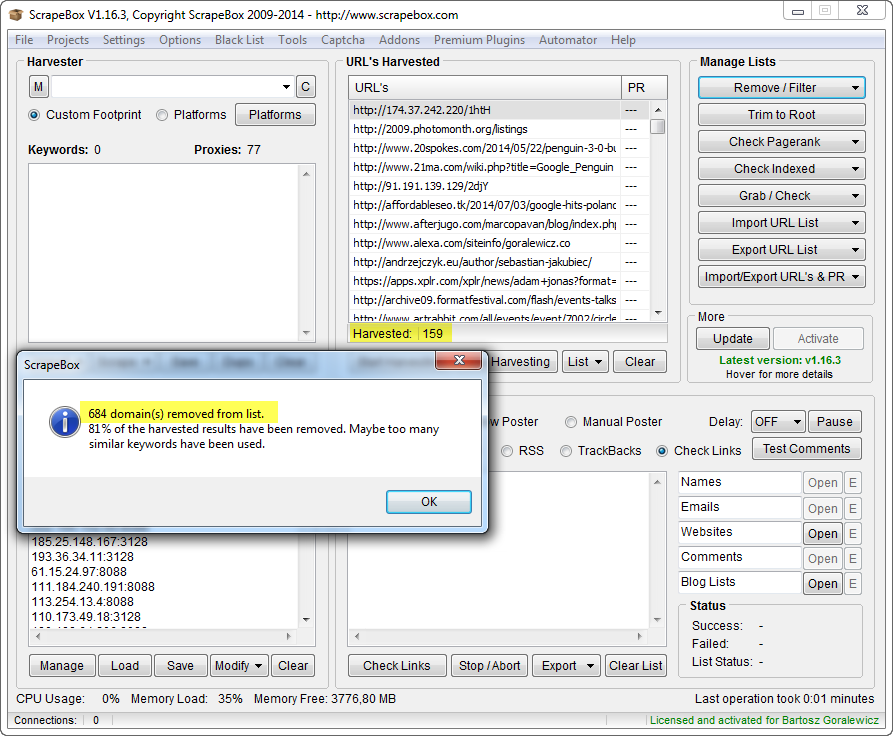
Now you can see the list of unique domains. ScrapeBox will show you the popup window with a report about the amount of duplicate domains removed.
Personally – I like to keep stuff tidy. I would rather see all of those domains in a top domain format only. So Domain.com instead of domain.com/page
3. Trimming URLs to root
With any list or URLs uploaded to the harvester’s field, just click the “Trim To Root” button.
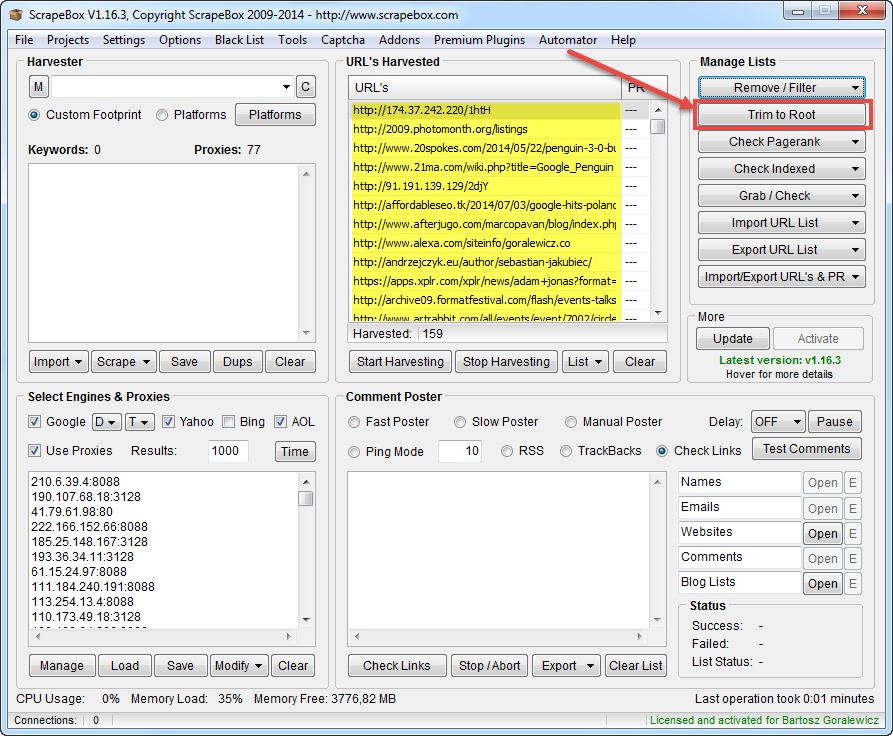
After that we should see only top domains with no subpages on our list.
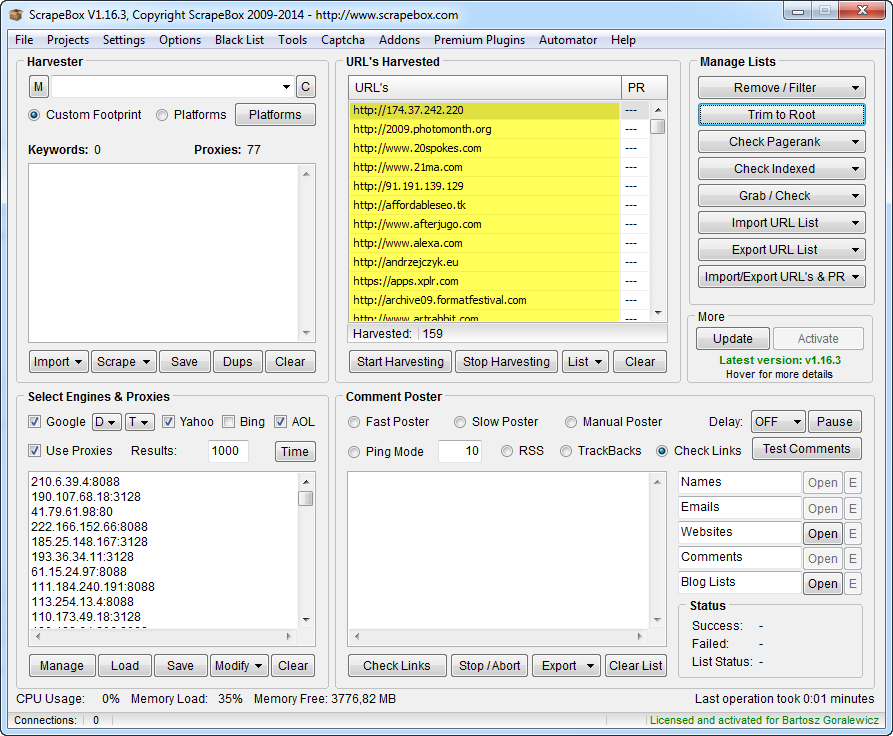
Now our list is de-duplicated and trimmed to root. This format is usually used when working with disavow files (for example to see the percentage of disavowed domains vs. “alive” domains linking to our website).
4. Exporting the lists
If you would like to export this (or any previous) list, you can of course do that as well. There are also some options to choose from while exporting lists.
To export any link list, simply click “Export URL List” and choose the option that suits you.
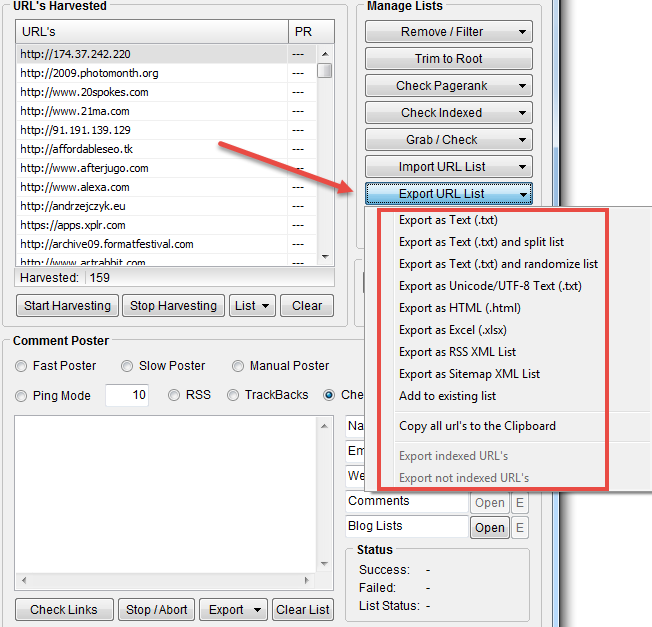
Export as Text (.txt)
Simply exports all the URLs to a .txt formatted file with the URLs listed one after another.
Export as Text (.txt) and split list
This option is really helpful when working on really large link lists. URLs will be exported into multiple .txt files with a selected amount of URLs in each of those files.
Tip:
I personally use it when I want to use the LinkResearchTools – Link Juice Tool, that accepts up to 10,000 URLs. If I want to analyze a larger list, I split it into the chunks that I then paste into the Link Juice Tool.
Export as Text (.txt) and randomize list
This option is pretty self-explanatory. All the exported URLs will be randomly sorted in the TXT file.
Export as Unicode/UTF-8 Text (.txt)
I have never used this option, but you can simply change the URL’s formatting to Unicode or UTF-8.
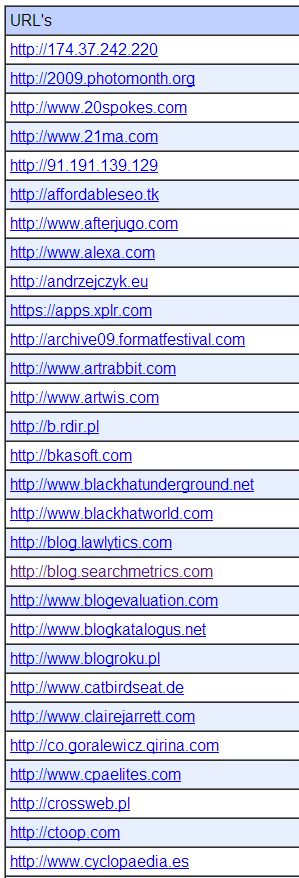
Export as HTML (.html)
This is an interesting option, used for indexing backlinks in the past. It exports all the URLs to the HTML list of links (example below).
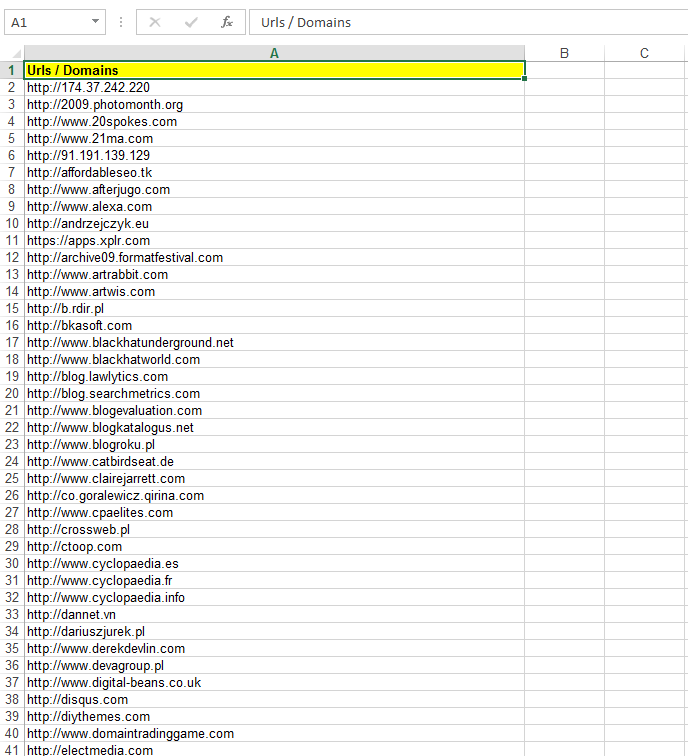
Export as Excel (.xlsx)
Exports all the URLs to Excel format (.xlsx) (example below).
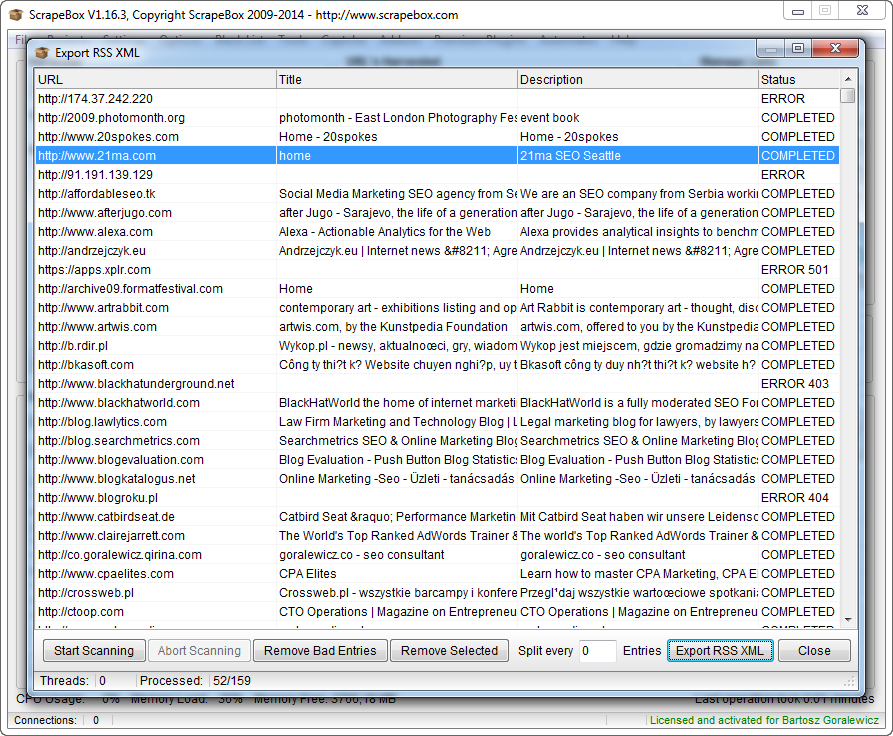
Export as RSS XML List
Creates an RSS feed from the link list and exports it in XML format (example below).
Export as Sitemap XML list
Creates a sitemap-format XML file from the link list. Really useful when used with the Sitemap Scraper addon.
Add to existing list
Simply adds the URLs on the list to existing the TXT file.
5. Checking for dead links/domains
After we’ve gathered all the backlinks, we need to find the alive ones and filter out the dead backlinks. We can do this with the ScrapeBox Alive Check addon.
Instructions:
- Open ScrapeBox
- Go to Addons and click ScrapeBox Alive Check
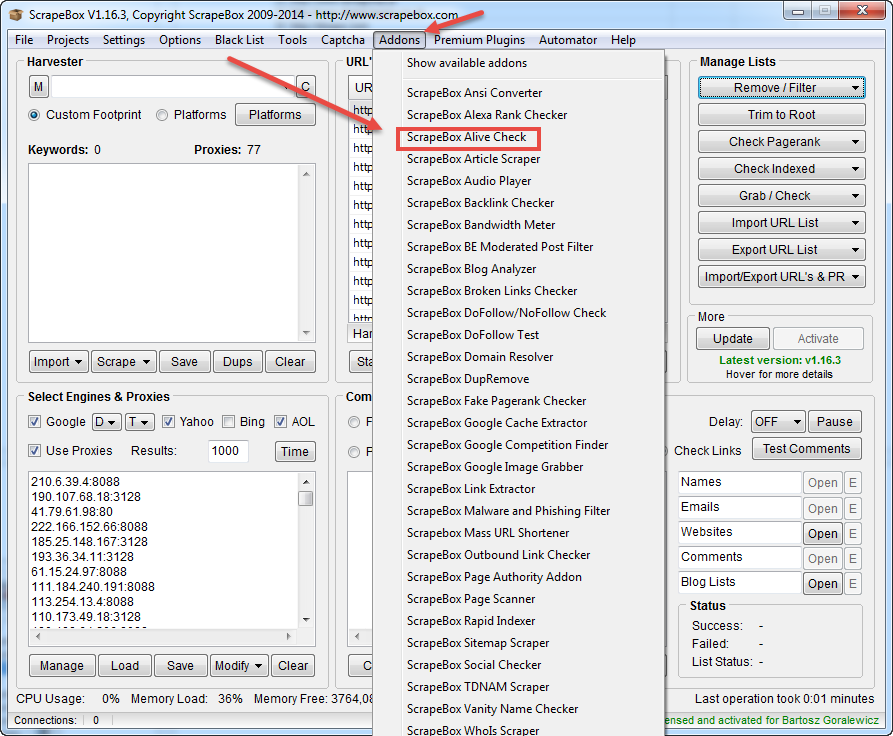
- Load the URLs that you would like to check
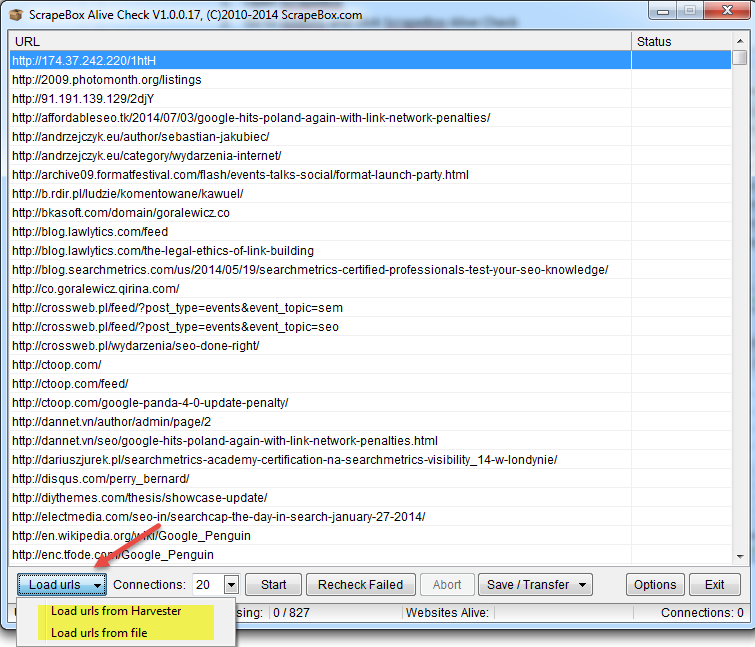
- Now, all you need to do is click Start.
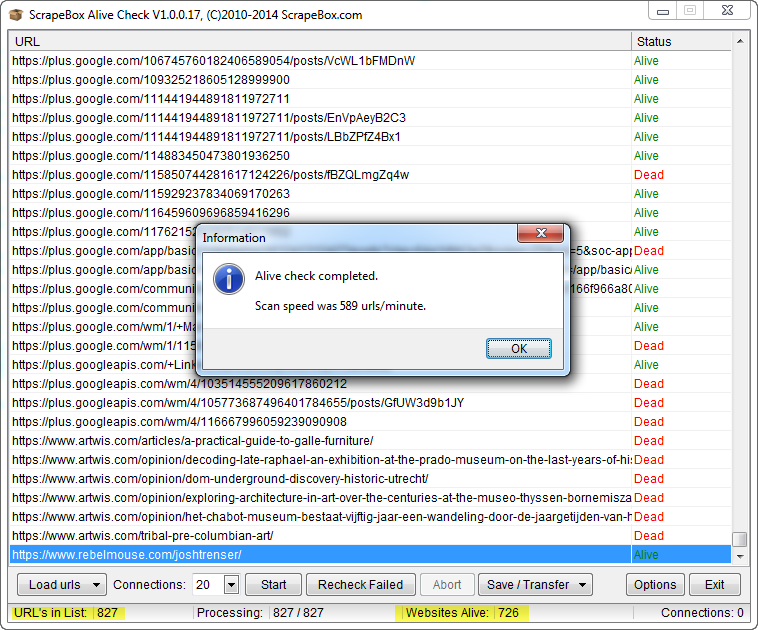
- After the check, we should see a window similar to the one above. You will find the stats of the check in the bottom of the window. Now all you have to do is save your alive and dead links.
- Click Save/Transfer and pick the option that suits you.
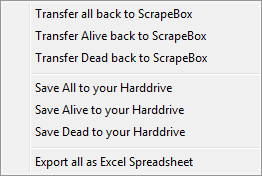
6. Remove duplicate URLs or domains in a huge list (up to 160 millions)
This is a feature that I wish I’s known about while working on my Expedia.com case study. With it, we can merge, de-duplicate, randomize or split huge lists (up to 180 million links).
To open this ScrapeBox Addon, we need to go to Addons and then click ScrapeBox DupRemove.
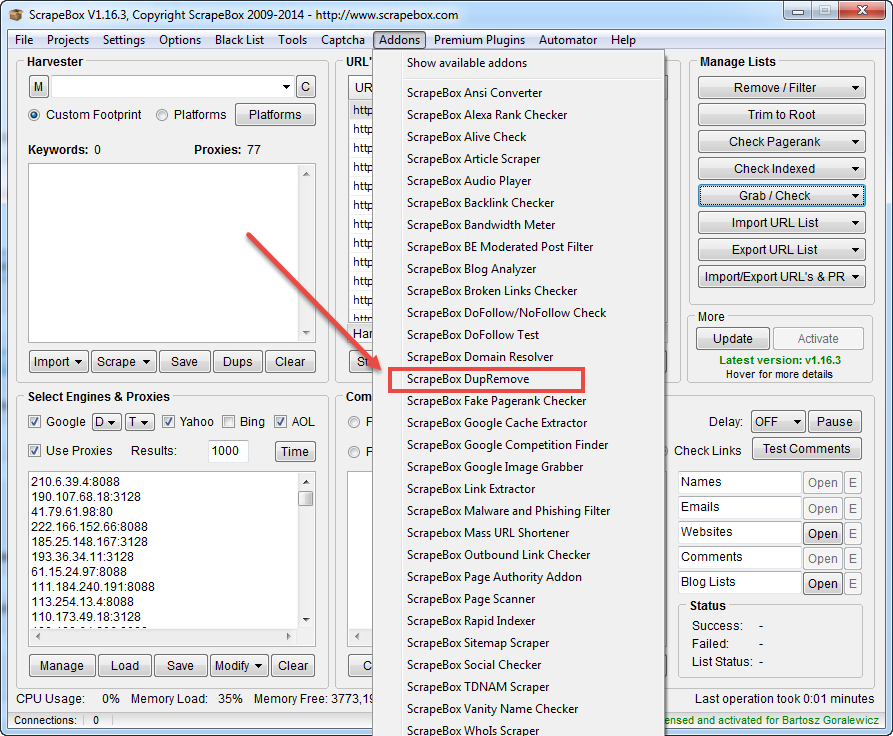
Now you can see a new window with the tool’s overview.
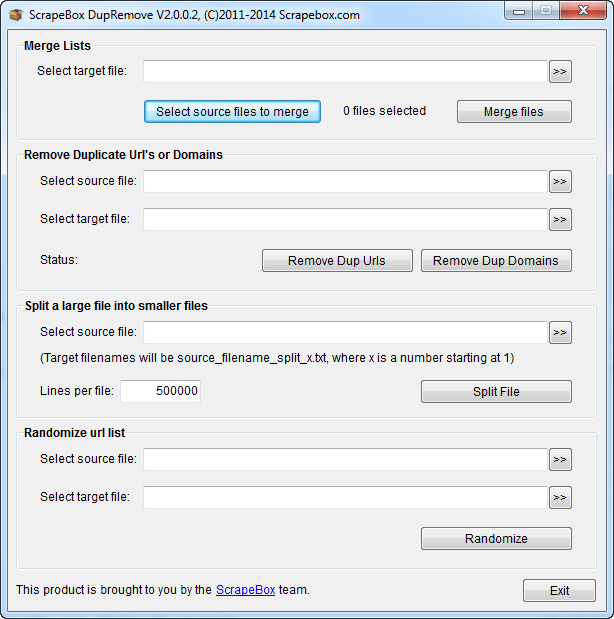
Using the tool is really intuitive. All you got to do is load source and target files with each part of the tool. For target files, I recommend using new and empty TXT files.
7. Scraping Google
This is probably the most popular use of ScrapeBox. In 2009 it was a feature allowing you to harvest more blogs for posting comments.
I personally use the ScrapeBox scraping feature for:
- Scraping a website’s index in Google (for on-page SEO purposes)
- Scraping backlinks’ footprints (SEO directories with duplicate content, footprintable link networks, footer links from templates etc.)
- Looking for link building opportunities
A word about proxies
To start scraping, we need some proxies, otherwise our IP will be blocked by Google after just a few minutes.
Usually the best way to find a Google proxy is to use the built-in ScrapeBox Proxy Harvester. Using it right is quite complicated though, and I will not cover the whole process here. As an easier way for SEOs starting with ScrapeBox, I recommend going to any large SEO forum. There are always a few “public proxy threads”.
As an example, you can go to one of the posts listed below and simply use the proxies listed there daily.
http://www.blackhatworld.com/blackhat-seo/f103-proxy-lists/
Tip:
The average lifetime of a Google proxy is 1 to 8 hours. For more advanced scrapes you’ve got to use either a lot of private proxy IPs or simply use more advanced scraping software (feel free to contact me for info).
Google scraping workflow
1. Find and test Google proxies
We’ve already got a few proxy sources (pasted above). Let’s see if we can get any working Google proxies from those lists.
Go to http://www.blackhatworld.com/blackhat-seo/f103-proxy-lists/
Find at least 2000 – 3000 proxies and paste them into the Proxy tab in ScrapeBox, then click on “Manage” and start the test. We are obviously looking for a Google Proxy.
This is how proxy testing looks:
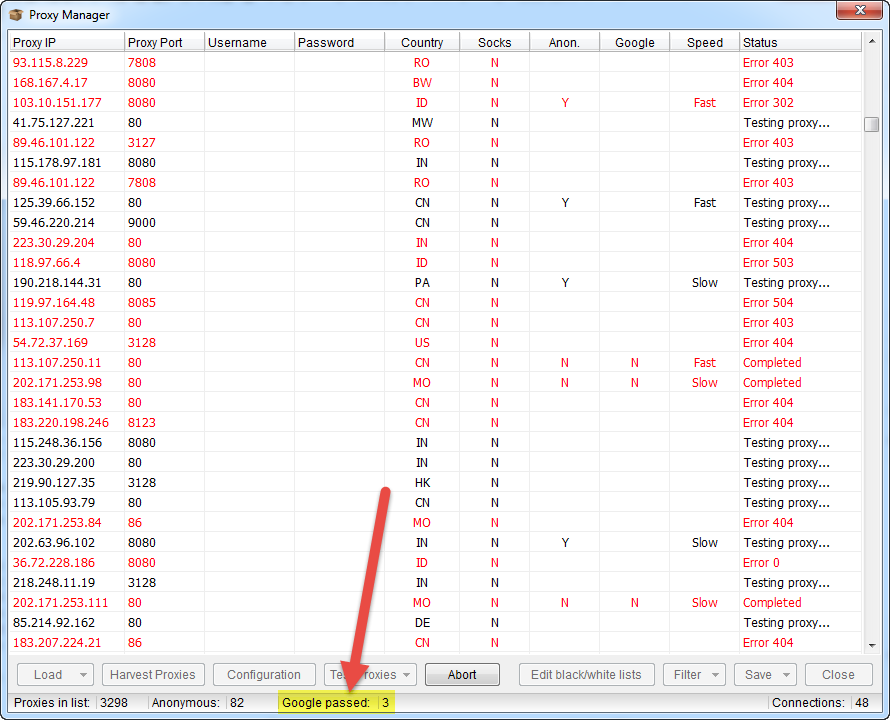
You will see the number of Google-passed proxies at the bottom of the screen. Google proxy will also be shown on the list in green.
After the test is finished, we need to filter out the list. To do that, click Filter, and “Keep Google proxy”.
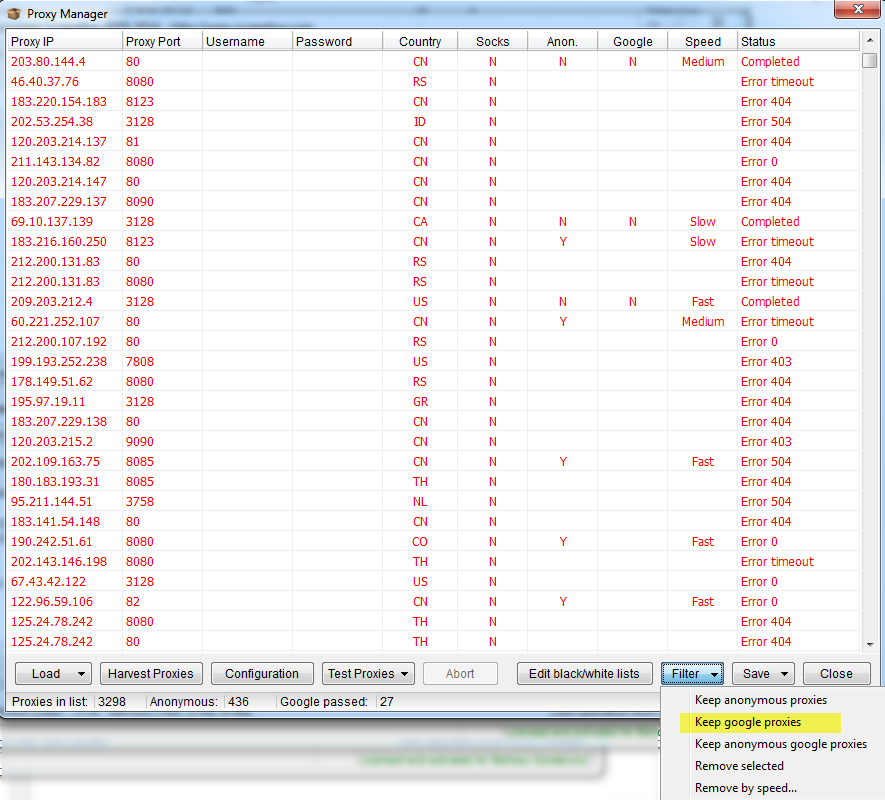
Now we’ve got only Google proxies on the list. We can save them to ScrapeBox and start scraping.
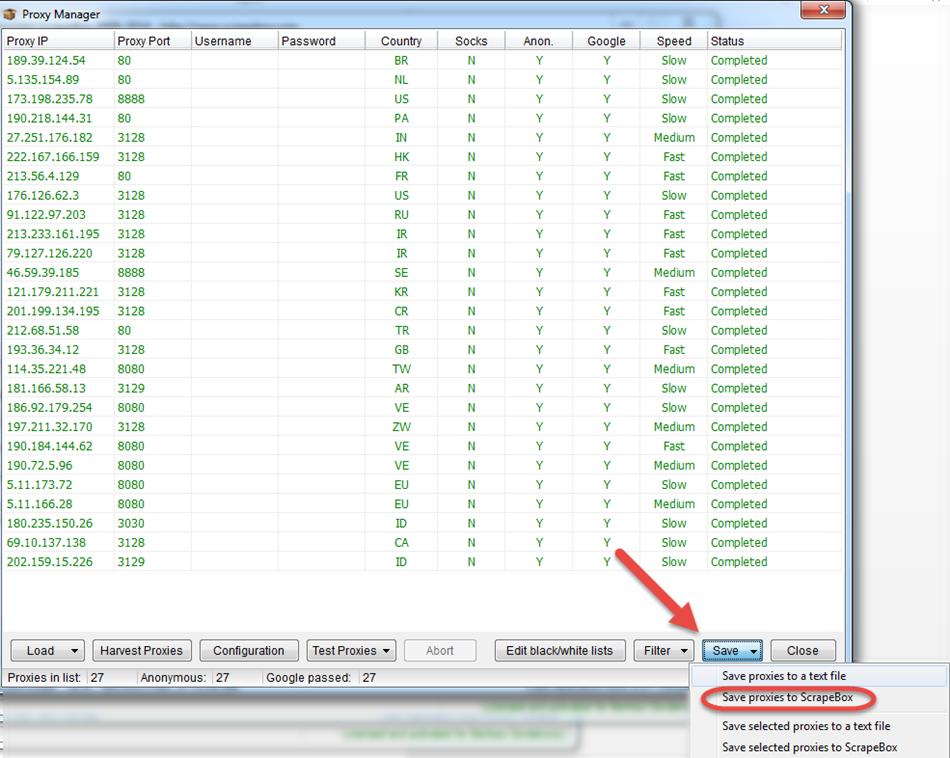
Note:
Remember to use proxies straight away, as they will usually not be alive for more than 1-3 hours.
2. Setup the desired keywords
Now that we’ve got the proxies, all we need to start scraping are our desired keywords or footprints.
To show the scrape in a “real life” example, I will scrape the footprint used for Expedia’s WordPress Theme. For those of you that didn’t read Expedia.com case study, it is a WordPress theme, with footer links. Pretty easy to footprint.
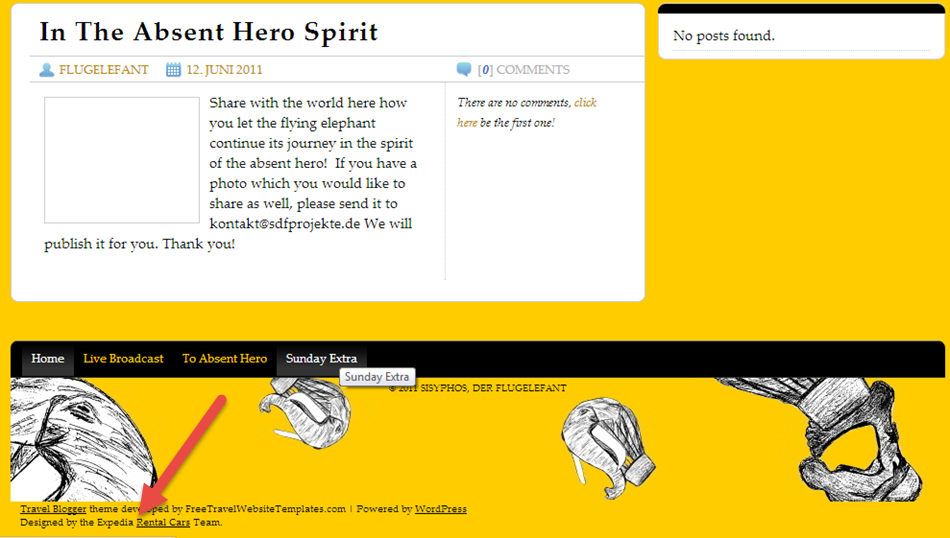
As you can see on the screenshot above, our footprint to scrape is “Designed by Expedia Rental Cars Team.”
Copy the footprint mentioned above and paste it into ScrapeBox.
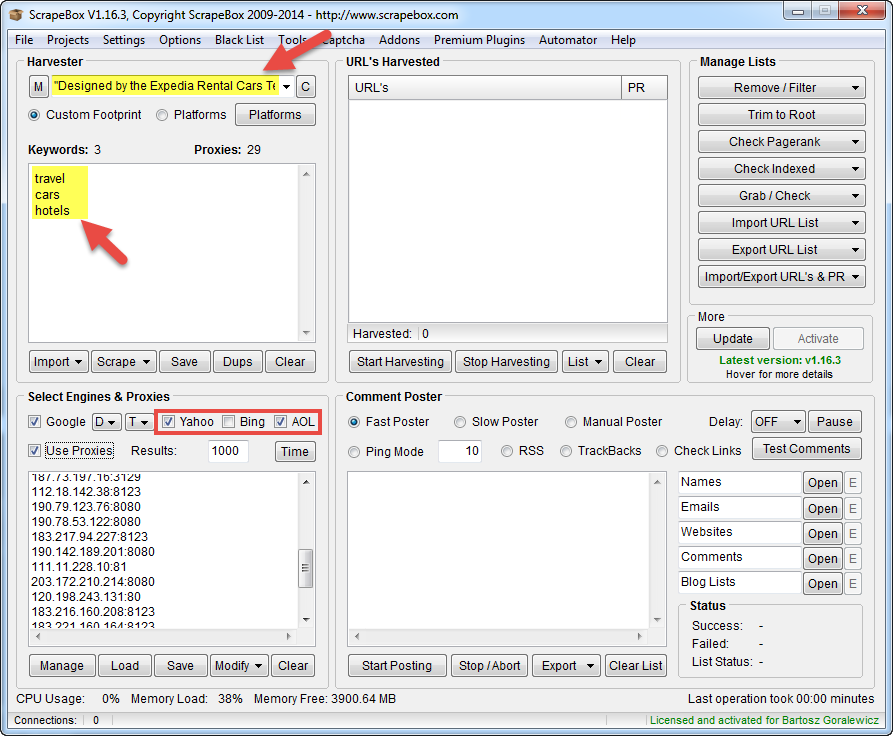
To setup your scraping, follow the screenshot above. Paste your desired footprint to the top right field. Then add as many keywords as possible (I only used 3, as this is just an example), to generate more results.
Yahoo, Bing, AOL
I personally don’t like using them. In my opinion, scrapes done with them are not as precise as the ones done with Google. On the other hand, I know that many of my SEO colleagues use those search engines quite successfully. I leave the choice to you. You can run some benchmarks yourself and decide for yourself.
Why should we add extra keywords?
Each Google search is 10 – 1000 results (depending on the setup). If we want to scrape, for example, 20,000 results, we need to use extra keywords, so our footprint will look like:
- “Designed by Expedia Rental Cars Team.” Cars
- “Designed by Expedia Rental Cars Team.” Travel
- “Designed by Expedia Rental Cars Team.” hotels
- etc.
This way we can cover much more “ground” and dig much deeper.
Tip:
Before scraping, Google your footprint manually. With that you can have a clear idea of what you want to accomplish, and then benchmark your results.
For the footprint we’ve got Google shows ~180 unique results.

Of course, having 180 unique pages scraped is a perfect score for us, but it is not always possible. Let’s see if we will be lucky enough to get close to 180 pages.
All we’ve got to do now is press “Start Harvesting”.
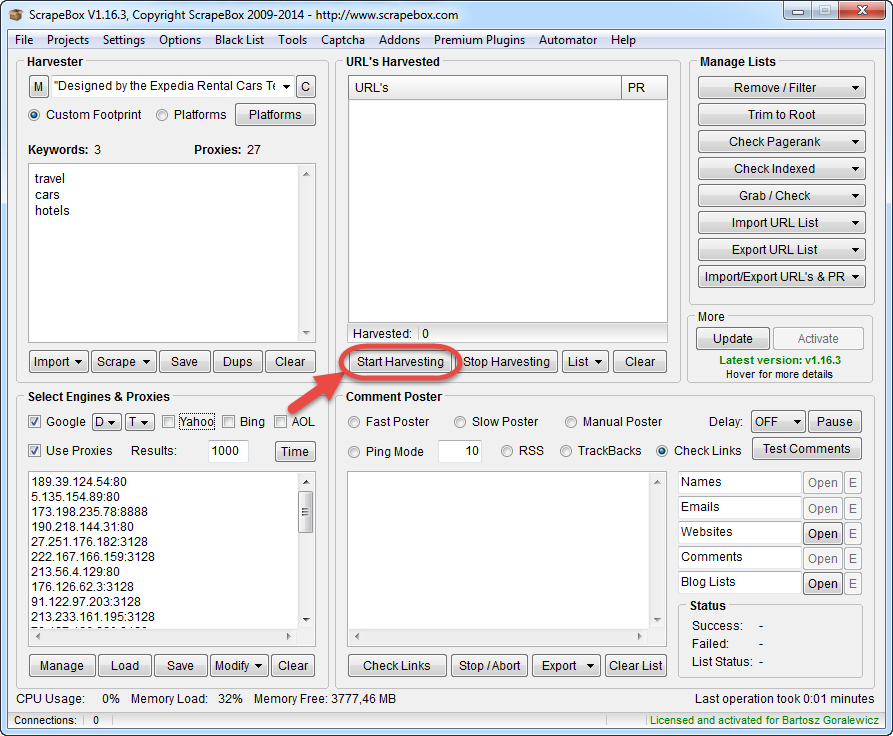
Now we can watch ScrapeBox doing what it does best. Scraping Google.
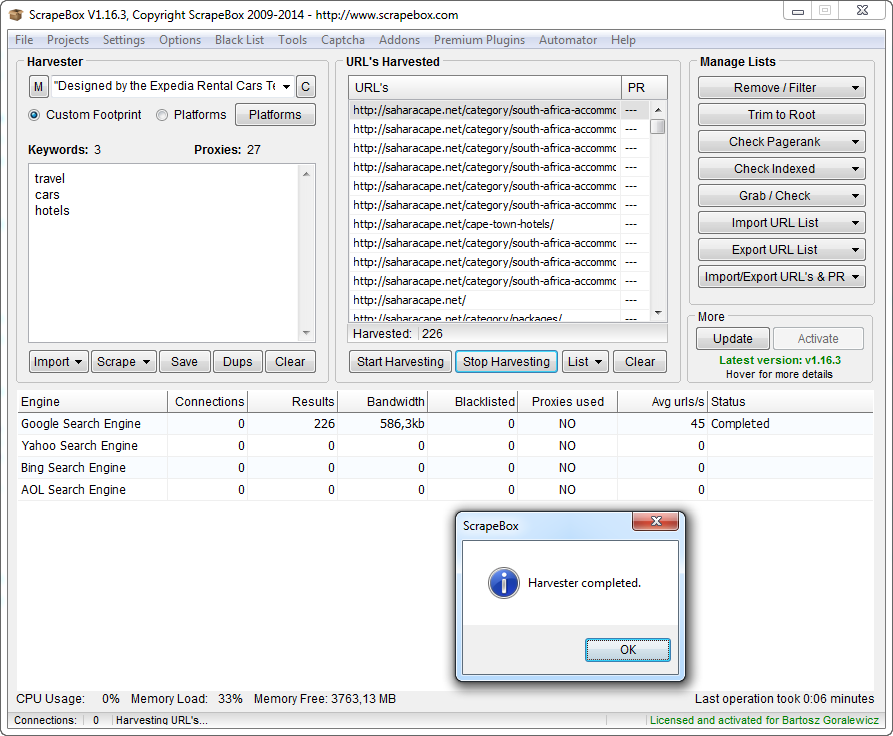
OK, the search is finished, we’ve got 226 results. This is not epic, but pretty good for only 3 keywords.
After clicking OK, ScrapeBox will show us the good (with results) and bad (no results) keywords.
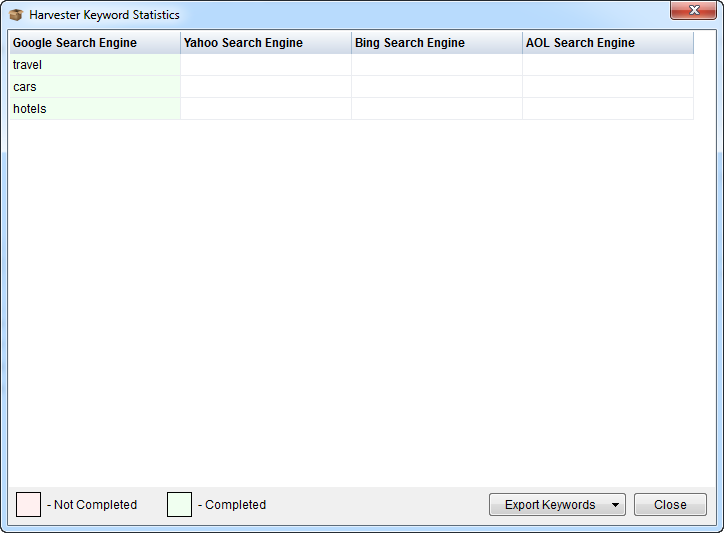
The stats above are really helpful, as with more complex searches you can be much more effective by filtering the keywords.
Unfortunately, we are not finished yet. The results we see are coming from different, unique searches, therefore they are almost always heavily duplicated. Fortunately all we need to do is click “Remove/Filter” and “Remove duplicate URLs”.
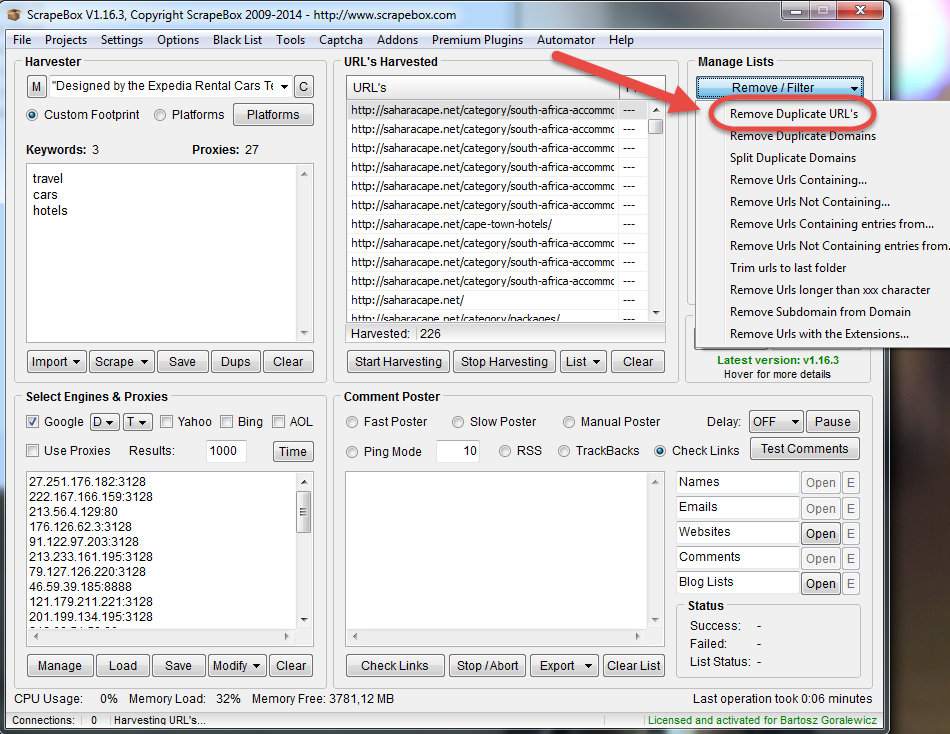
Let’s see how close we are to our desired 180 results:
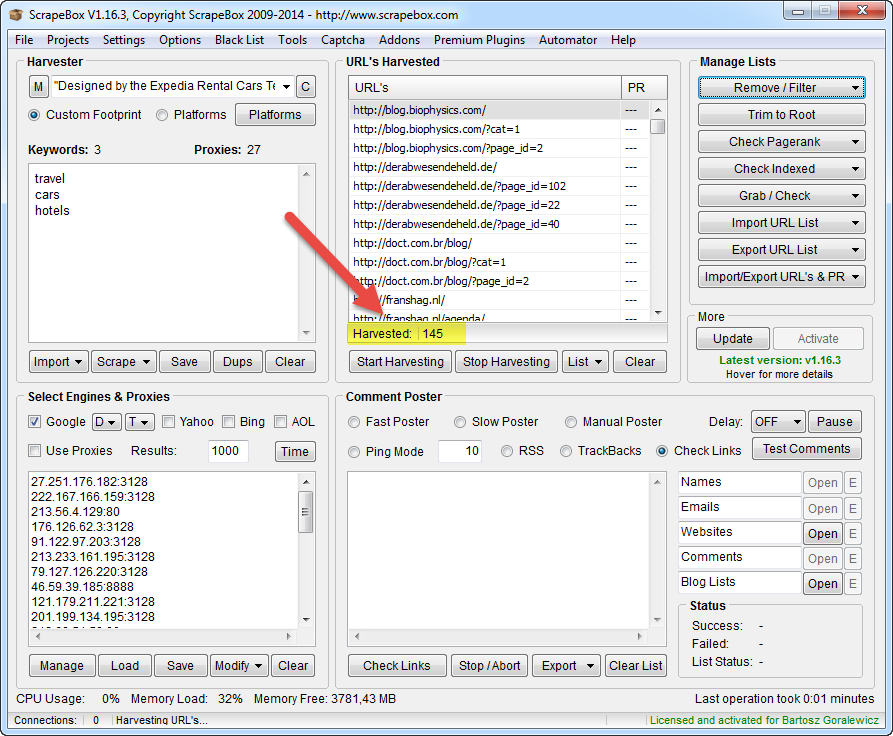
We’ve got 145 unique results. With only 3 keywords used, this is a really great result. There are probably ~35 more pages that we missed out there, but I’m sure that we’ve got all the unique domains on the list.
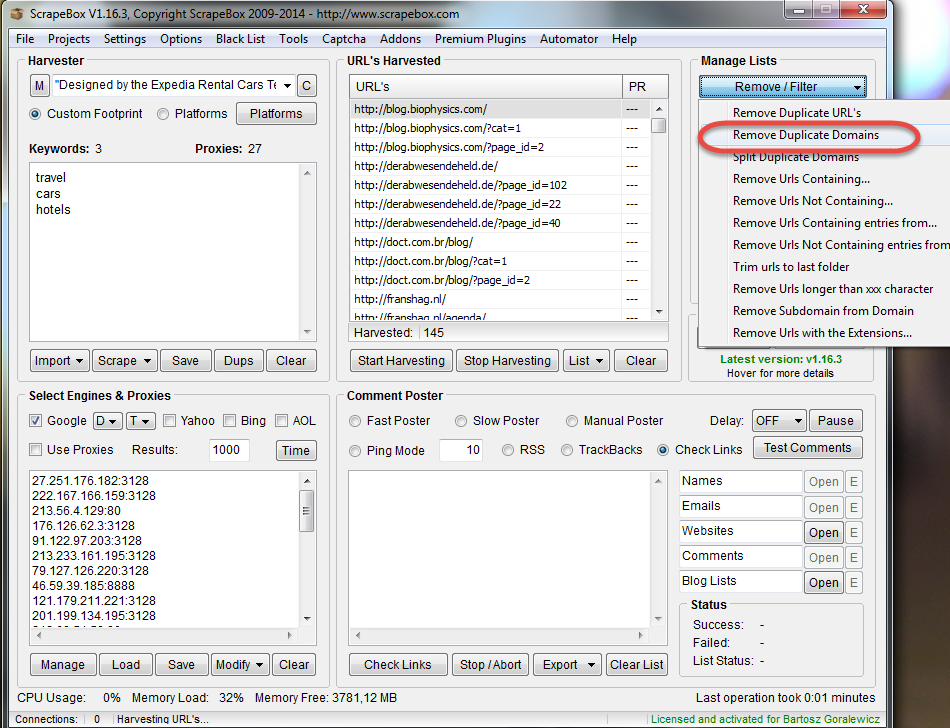
Now let’s see the results:
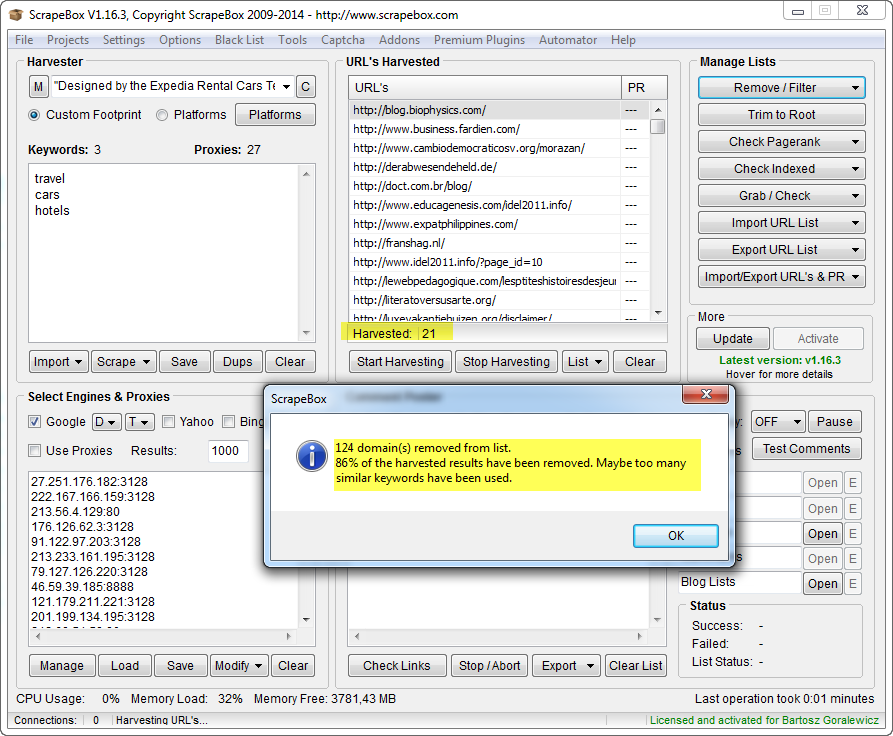
With ~ 15 minutes of work, we’ve got the whole footprint scraped. 145 unique URLs with 21 domains.
In my opinion, scraping is a skill that is really important to anyone dealing with link audits. There are some SEO actions that you cannot do without scraping. The Orca Technique is a great example. It is not possible to implement it fully without scraping Google.
Scraping and de-duplicating is not all you can do though. Imagine that you want to see which of the domains above have already been disavowed. We can do that just by a really simple filtering.
8. Filtering the results
This is my favorite part. This is something that is really complicated (at least for me) to do with e.g. Excel. ScrapeBox couldn’t make it any easier.
Let’s go back to the example of one of my customers – www.extremetacticaldynamics.com. This situation was also described in my “Squeeze more juice out of Google Webmaster Tools” case study. Working on their backlinks is quite complex, as the disavow file is huge.
Of course Link Detox is doing all the work for us, but I want to show you how you can filter the disavowed links out of the link list with ScrapeBox.
First, we need to load a large link list to ScrapeBox. A report from Google Webmaster Tools will be a good example here.
All we have to do to start is copy the backlinks from the Google Webmaster Tools CSV export to ScrapeBox.
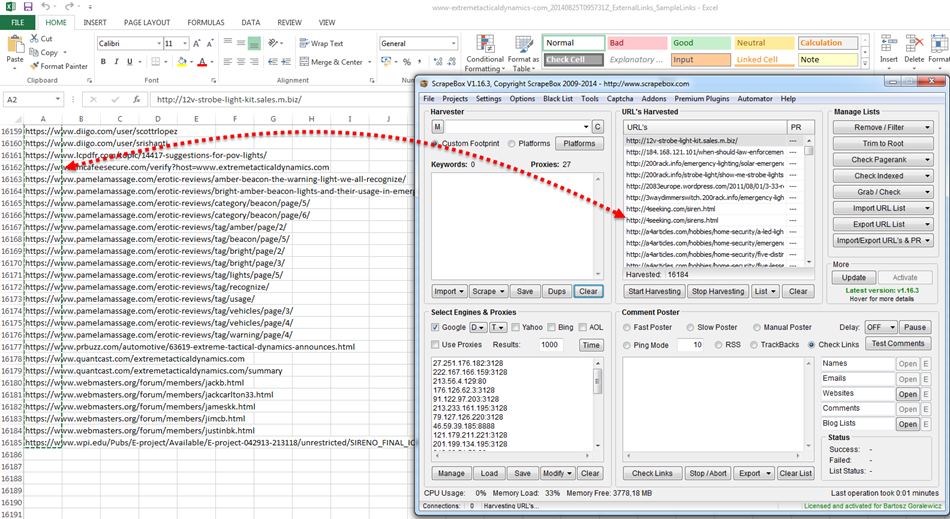
After importing the URLs, let’s remove duplicates (yes – there are duplicate URLs in GWT exports).
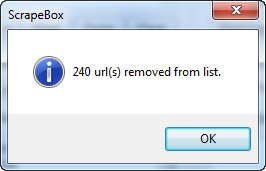
As you can see, there were 240 duplicated URLs.
Now what I would like to do is to filter out all the disavowed URLs.
To do that, we are going to use the “Remove/Filter” options.
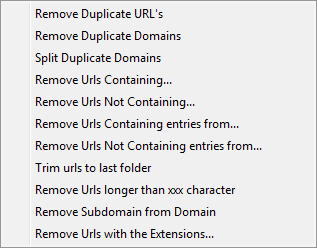
As you can see, when we utilize the options listed above wisely, we can filter out almost everything. To filter out all the disavowed links, we are going to use the “Remove URLs Containing” option.
Workflow:
- We need the disavow file. It is best to download it from Google Webmaster Tools using this link: https://www.google.com/webmasters/seo-tools/disavow-links-main
- Copy the CSV content to TXT (Notepad or Notepad ++) file (to get out of Excel as quickly as possible) ☺
- Use the “Replace all” option in Notepad to replace “domain:” with nothing. This way we get only a list of single disavowed URLs and domains.
- Save the TXT file to your hard drive as e.g. “Disavow-extremetacticaldynamics.txt”
- Go to “Remove/Filter” and click “Remove URLs Containing entries from…” and select your saved disavow file (without “domain:”).
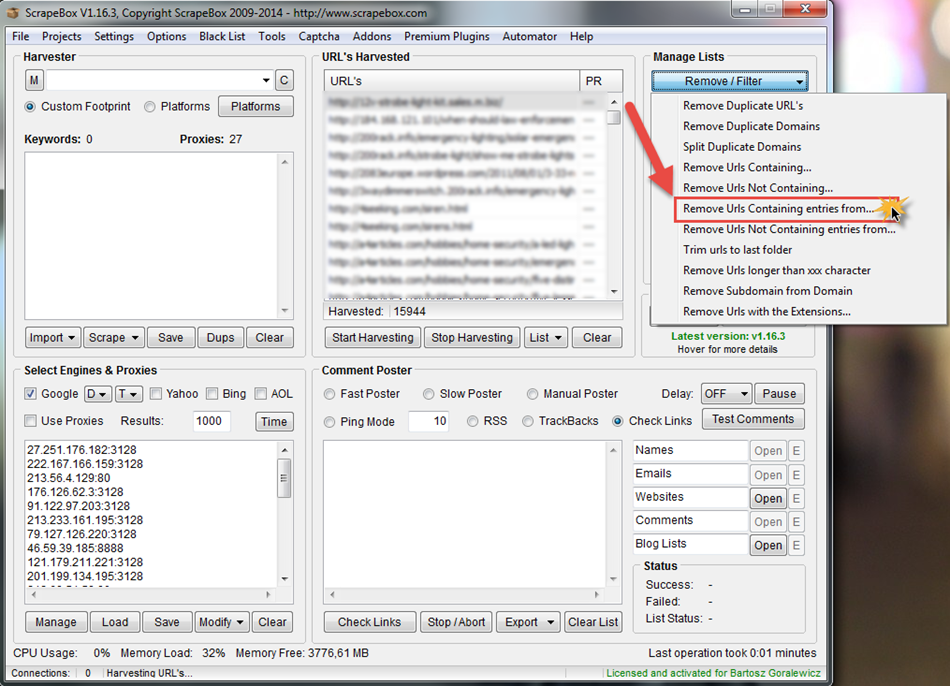
- Now we can see the filtered results. What we can see here is ~11k links removed from the list.
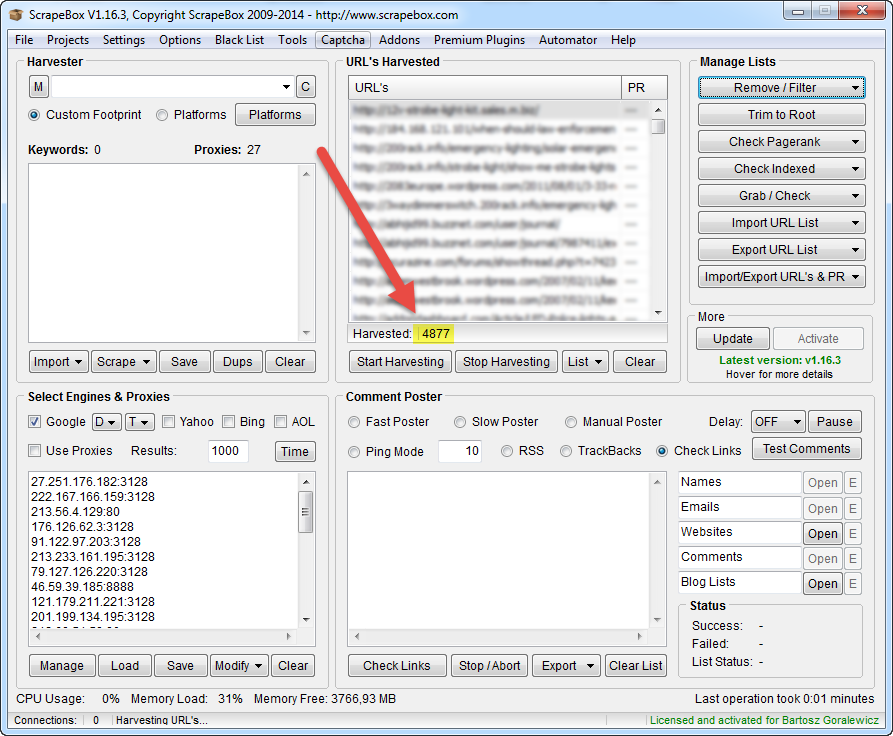
- We are done. Our list is filtered by our disavow file.
I think that the example above should give you an idea about the possibilities of processing your URL lists with ScrapeBox. This is a basic tutorial, but with just a few hours of playing with ScrapeBox you can become an advanced user and forget about Excel.
9. Scraping Google Suggest
This is one of my favorite uses of ScrapeBox. I think that Google Suggest holds a lot of interesting keywords that we can use for scraping, post ideas or keyword research. It is also one of the easiest features to use.
Workflow:
- Open ScrapeBox
- Click Scrape
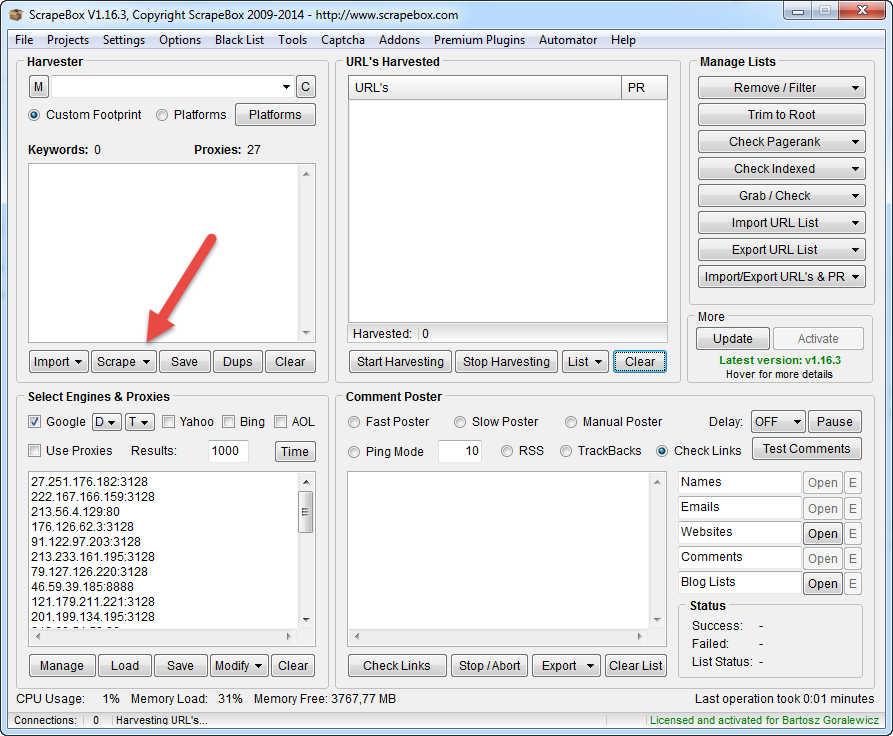
- Enter your source keywords
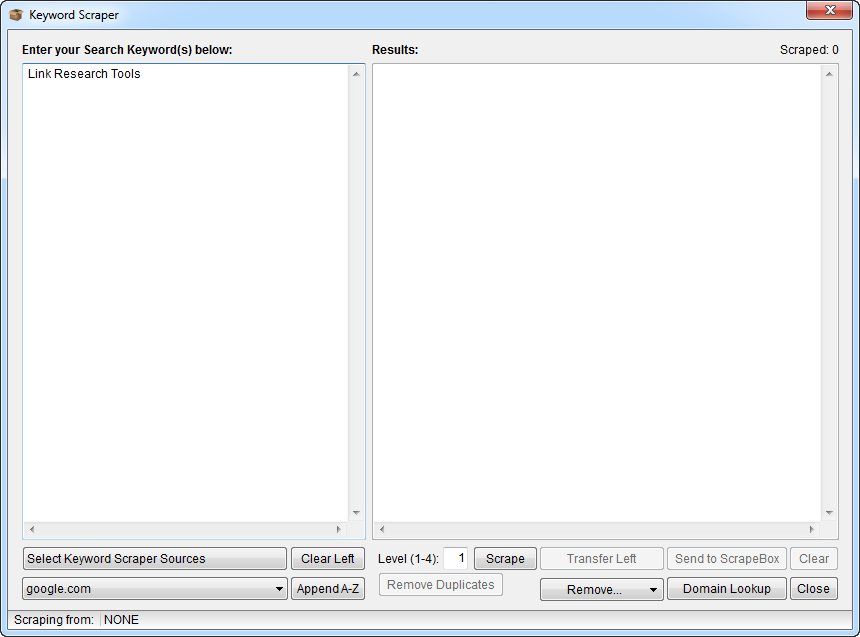
In this example, let’s use LinkResearchTools as our source keyword. Usually we should use many more than just 1, but this is only to show you how this tool works.
- Select your Keyword Scraper Sources
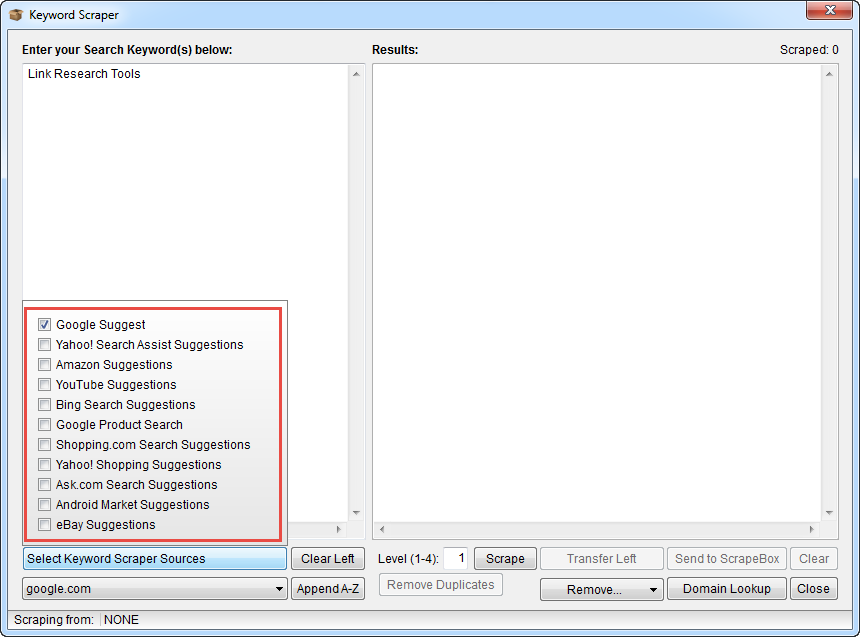
As you see on the screenshot above, you can also choose Bing, YouTube and many other engines. In this example, I will only use Google Suggest, though.
- Click Scrape
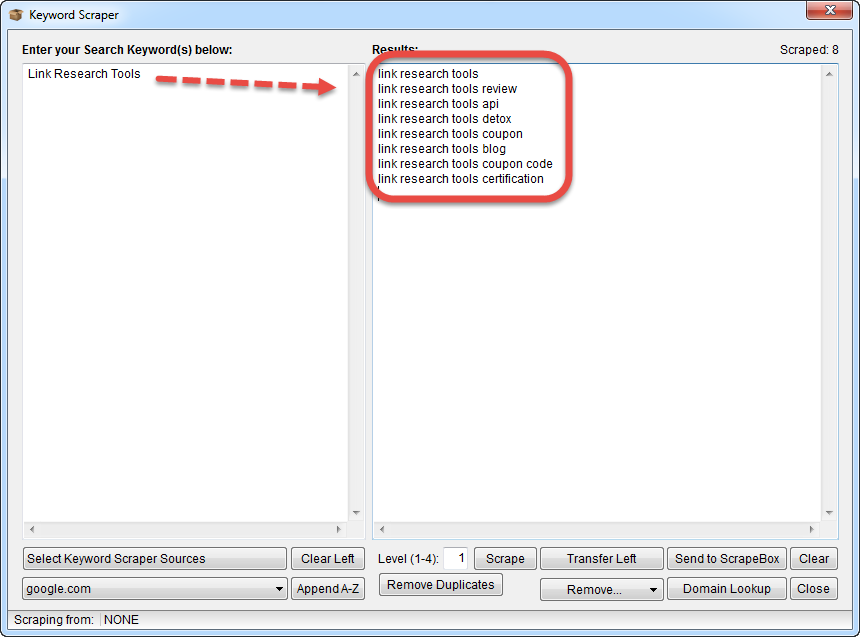
And we’re done. You can see the Google Suggest scrape on the right. To get more results, you obviously need more keywords, or you can play with Level (1-4) of scrape.
Tip:
I often use it to monitor all the brand-related searches. You would be surprised how much info you can get with just 1 brand keyword (example below).
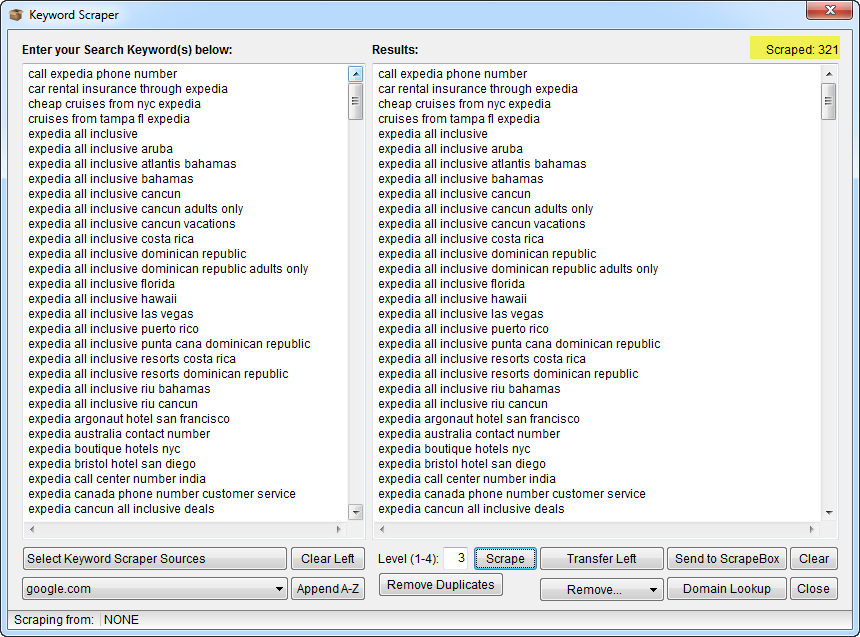
Just with typing in 1 keyword – “Expedia” and setting the level to 3, I got 321 brand related keywords searched in Google.
Conclusion
LinkResearchTools is making a lot of the link audit workflow quite easy already. You would be surprised how many processes described here are actually happening in the background the moment you start any report in LinkResearchTools. Unfortunately, there are unusual cases, when you need to do a lot of manual work. ScrapeBox is a good tool to organize and speed up your manual searches and link processing.
This was just a basic tutorial. I would be happy to create some more advanced SEO tools tutorials as well. If there is any area that you would like me to cover, please contact me or comment below!
This case study was written by Bartosz Góralewicz, CEO at Elephate, and proud user of LinkResearchTools and Link Detox.
A word from Christoph C. Cemper
SEOs live and die by their tools and processes. Fortunately for us, we have an expert SEO willing to crack open his safe of SEO tricks and share some of them with the rest of us. I hope you enjoyed this tutorial and now have many ideas for how to use his tips to simplify your processes.
Our goal is to provide our user community and clients with quality service and knowledge. Our LRT Certified Professionals and Xperts like Bartosz are key to achieving this goal.
I look forward to Bartosz’s future work, and I personally recommend working with him whenever you get the opportunity.


